Sunday, February 21, 2010

Crusty Olive Boule and Dehydrated Food


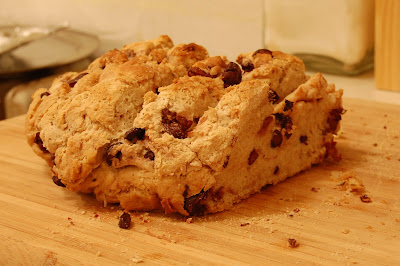
Behold, my first (successful) loaf of gluten free bread! I had seen this recipe on Gluten Free Girl and the Chef's blog recently and it looked delicious. Last week Jenn posted her own success and photo's of the bread on The Whole Kitchen and I decided I would try my hand at it today. This was only my second time making bread ever, gluten bread included. My last loaf was really really dense and it was my first time working with yeast. It still tasted pretty good and I ate the entire thing, but I knew I needed to look up some bread making tips, particularly gluten free bread making tips.

The recipe makes two loaves and the dough is good in the fridge for up to 7 days so I baked one tonight and I'm saving the second to pop in on Thursday or Friday. This will probably be my go-to bread recipe from now on and I'm already thinking about little adjustments I can make. The salty vinegar taste of the kalamata olives gives the bread a sourdough taste and made me remember how much I love sourdough bread. Apparently I'm not the only one because I just stumbled upon the Art of Gluten-free Sourdough. I'll definitely be revisiting this idea.

Ryan and I are trying to be really budget conscious now. Last month we decided to try and stick to an $80 a week grocery budget. Very tight (and didn't include our F.O.O.D. box) and a little too tight to realistically live on. We've upped the total weekly budget to $123, including the box. Using Gail Vaz-Oxlade's ingenious approach, we keep our grocery money in a jar, each putting in $50 a week. Even though I really make an effort to use as much as I can before things go bad, depending on the perishables we have on hand, sometimes we still end up putting a fair bit in the garbage or compost.

The fact that we live in an apartment and have a small than average fridge means we have virtually no freezer space to store frozen perishables. More and more I'm becoming fascinated with different ways of perserving food. As I've said before, I'm really interested in canning but collecting all the materias needed is going to take me a while and be fairly expensive so I'm thinking I'll collect the things I need a little at a time, maybe buying a piece every month.

In the meantime I've been thinking about food dehydration a lot more. I've always really liked dried fruit and jerky - jerky is one thing that I often can't eat anymore because many types of jerky use soya sauce or teryaki sauce, both of which often contain wheat. I got interested in food dehydration last summer when I was planning some backcountry camping trips. A lot of people will just pick up a package of dehydrated food to bring on these trips, then you add water to rehydrate when you're ready to eat it. There's no reason why you can't just make these meals at home yourself for a much more reasonable price.

I was excited to be able to dry dehydrating food in the oven when we moved into the apartment until I discovered you can't set the temperature below 170 - something that has caused me aggravation more than once so far. But after browsing Amazon.com I realized I could purchase a good quality dehydrator for less than $100. I'm going to do a little more research but once I've decided on a model I'm pretty sure I'll purchase one within the next couple of weeks.

I just discovered a great new blog called Well Preserved that has me excited about trying out some new things that hadn't occured to me before, like a few of the following here:

Dehydrated onions and carrots

Dehydrated orange slices
Dehydrated lime and lemon zest
Dehydrated lemons
Dehydrated pineapple and apple

Beginning around early July, we aren't planning on signing up for the F.O.O.D. box. At that point the St. Norbert Farmer's Market will be open and we'll likely do most of our weekly shopping there, meat included. The F.O.O.D. box is great because now I'm at the point where I'll see what we'll be getting, make a list of the most perishable items, and then make a list of possible recipes to throw together. This has meant we've been able to use almost all our items without throwing anything away for the past two weeks. The farmers market will mean I won't have the ability to plan my meals as easily but it will give me the freedom to try even more variety and to bulk up on items for (hopefully!) canning and (hopefully!) drying.

Now that seeds are starting to appear at some local grocery stores too, I'm looking forward to getting a few pots to fill our windows. These old apartment windows are great for plants because there's more than enough room between the outside screen and the inside window pane - having fresh herbs again will be fantastic. The Forks has a decent variety but why pay when I could get them for free?

Now that February is almost over and we're about to enter March, I can just about feel spring just around the corner. Winnipeg is still a long way off from "warm" but I'm getting excited about having more time (a training course I'm in ends at the end of March) and longer days to enjoy the local flavours, sights, and sounds.

Thursday, February 18, 2010

Guest Post: Making Butter with My Mom

My mom has been making her own butter for a couple of years now. She still buys butter, but if there's a sale on whipping cream she's all over it. A few weeks ago she made 46 pounds of butter. That's right: 46 pounds. I asked her to write me a guest blog post about her butter making experiences and she finally sent it along the other day. Right now I have 6 blocks of her frozen butter sitting in my freezer. Butter lasts us a long time in this house so we're set for the next couple of months at least.

Adventures in Butter Making by Jo

I am finally writing about my adventures in butter making. Last year in January, after the rush of Christmas, I was grocery shopping and noticed the store was clearing out cartons of whipping cream - a litre or quart for $1. The expiry date was only 2-3 days away though. This was a ridiculously low price and I knew from past experimentation that I could make about 12 ounces or 340 grams of butter from a litre of whipping cream, hence a pound of butter could be made for $1.25. This is an amazing buy for fresh whipped butter.

This year the same store was clearing out their cartons of whipping cream again but the Beatrice brand had a $.75 coupon on the side of the cartons. I bought 27 litres of cream for $27 and took them home. I poured them into 4 litre plastic milk jugs I had saved (I was preparing for this mass making of butter before Christmas when I first spotted the cream coupons). I then cleaned the cartons, cut out the coupons, and went back to the store for more cream. Coupons in hand, I purchased another 27 litres of cream for $.25 a piece (if you're keeping track, that's $.25 for a pound of butter).

We had a lot of people ask why we were buying so much cream. I told people I was making it into butter and I was slightly insane. The cream is close to its sell-by date - actually sometimes I think I'm pretty close to my sell-by date too (I digree - Erin, you know I do this all the time you must have expected it!!!). Anyway, it needs to be whipped into cream, which you could also freeze and use next time you need whipping cream, or it needs to be whipped into butter. Just so you know, whipping cream cannot be frozen unless it is whipped into whipped cream or butter.

Whipped 8-10 pounds of butter, as I made last year, takes a bit of time. But I have to admit that whipping 46 pounds of butter is not for the faint-hearted. In fact, my granddaughter, Amaya, was asking me towards the end of my two and a half days of whipping when I would finally stop. But 46 pounds of butter in the freezer will last us almost a year so I think it was worth it and everyone likes the delicate, creamy taste of fresh butter.

Homemade Butter Making Method

  • 1 litre whipping cream
  • 1/2-3/4 tsp salt for salted butter OR omit for unsalted butter
  • hand held or stand mixer
I use a large stand mixer that holds a litre of cream. I add the salt (or omit for unsalted) and mix on medium speed. If you mix too quickly in the beginning you'll just have a big mess so start slow and increase the speed as it mixes.

It will reach the usual whipped cream stage but you need to go past this point. It will get thicker and separate out from the buttermilk or whey, and will magically turn a pale yellow colour. I whip at a lower speed at this point because as it completely separates it can make a watery mess and surprisingly splash you in the face.

I then put the butter in a wire sieve with a bowl underneath to catch the buttermilk and let it sit while I start the next litre of whipping cream. The butter needs to have as much of the buttermilk squeezed out as possible. After trying a number of methods, I opted for what Julia Child always said and I used my impeccably clean hands.

I weighed the butter out into 340 gram portion sizes, wrapped it in parchment paper molded into bricks, put serveral portions in a freezer bag, and tucked them in the freezer. I also froze about 8 litres of buttermilk, which is nothing like the store bought variety and has a much milder flavour. (*Erin says: I use it to make whey - I'll post more about whey a little later).

Try making a small amount sometime, I think you will like the flavour. As I said, whipping up this much is a lot of work and I have become slightly posessive about my hoard of butter. But honestly, the end result was very satisfying both in taste and price and Amaya was happy when I finally turned off the mixer.

-Mum

Tuesday, February 16, 2010

Canning

Being that it's the middle of February in Winnipeg, it's not exactly ideal canning season. Canning, preserving, and fermenting foods has fascinated me for a while now. For the last couple of years I've thought that I would like to try my hand at canning and jamming but once again, since I was living at home I never took it anywhere.

Home canned foods will forever and always remind me of my grandma. When I was growing up my grandma lived close by in a cute little bungalow (with carpet in the kitchen and bathroom...ew) with a giant backyard. Like a typical Ukrainian-Canadian woman who grew up on a farm, my grandma always maintained a giant garden which she paid me and my older brother to help her keep it going. I don't remember where she kept her glass jars full of carefully canned food, but I always remember there being cans of different sorts of foods sitting around. I can even remember the writing on the labels. I think she would write the name and date on a small piece of paper and then put multiple layers of tape over top.

My dad and grandma...must be early-mid 60's.

Unfortunately my grandma moved out of her house over 10 years ago now, when I was barely a teenager. Back then I wasn't too concerned with asking her about her amazing cooking, and her huge garden, and all the skills she grew up learning. On August 1st, 2006 my grandma passed away and I always wish I could have shared some of that with her.

I would be lying if I said my interest in canning, jamming, and preserving wasn't partly a tribute to my wonderful grandma but it also seems like a natural progression in my ever-growing whole food, sustainable living life. My parents have some experience with canning but either than dill and mustard pickles, no one I know does it on an ongoing basis with different veggies, fruits, and jams.

One of the downsides to being so young when my grandma moved out of her house is that I was never able to go through all the neat things she had stored away in her house. Her basement was full of bowling trophies (one of which sits in our living room now), paintings and pictures from many years past, and a lot of nooks and crannies where interesting little treasures were stored - like a giant popsicle stick house. The picture above was actually taken in the same basement. She had a "laundry chute" (a hole with a door in her bedroom closet) and I remembering lying down on the floor with my head through the whole and I found a bunch of my grandpa's old tools hidden on top of a vent.

But I digress. The point is, I don't have any canning equipment. I don't even have a pot big enough right now. I don't have a candy thermometer, I don't have a jar rack, I've got nothing. But I do have a library card! Since it isn't ideal canning season anyway, I'm taking this opportunity to bone up on anything canning related so that when I begin, hopefully this summer, I'll have a vague idea of what I'm doing.

In the meantime, if you have any websites, info, or tips to share please do so in the comments! So far I've been religiously following Tigress in a Jam, Tigress in a Pickle, and Canning Across America.


Monday, February 15, 2010

Sweet Potato Hummus

FGWRC's Women's Night of Culture was last Thursday and it was fantastic. We had a great turn out at The Park Theatre and despite a few hitch's here and there, everything went really well. I even won a draw prize that had some very nice treats inside, including a 10-class pass to a near-by yoga studio and Great Tastes of Manitoba: Celebrating Delicious, Local Food put out by Food Manitoba. I haven't had a chance to use it yet but it's put together beautifully and looks like it will be fun to use. One of the great things about the layout of this book is that the cover is hard, but rather than a traditional book binding, it's bound with coil on the inside so you can lay it down flat without the pages flipping around.

This weeks box, picked up on Wednesday - before splitting with our box buddies (who have decided to stay in for a bit longer).

As usual, my cooking plans changed when I came down with a really bad cold that had me mostly bedridden on Friday. I've felt better the last couple of days - better being out of my housecoat and not sleeping for two hours in the afternoon - but still not great. I've been wanting to get outside and have some fun but I'm just not feeling up to it, so today I had a cooking day.

Hazelnut spread in the jars, Honey Spice Almonds (both from The Whole Kitchen), Sweet Potato Hummus, and Root Veggie Red Curry Soup (sweet potato, carrots, onion, garlic, kale, red pepper, broccoli, cauliflower).

I've been wanting to make homemade hazelnut spread for years but just never got around to it. We picked up some hazelnuts at the bulk store and I whipped it up in the food processor today. It was really really easy and tastes amazing. I've been making the Honey Spiced Almonds frequently since Jenn posted them. They're delicious and a great snack. They don't have any added oil, just a touch of honey and spice.

The sweet potato hummus was inspired by the one sold at Grass Roots Prairie Kitchen. We've picked it up a few times from The Forks but when sweet potatoes came in our Fresh Option Box this week I figured I'd give it a go. I think mine was probably less sweet potatoe-y and definitely more spicy but I really liked the way it came out. A touch of sweetness and nutmeg mixed in with the regular delicious hummus taste.

Sweet Potato Hummus
  • 1 can chickpeas, drained
  • 1 small sweet potato or 1/2 a medium/large (ours were quite small)
  • 3-4 cloves garlic, depending on taste
  • 2 tsp lemon juice
  • 2 tbsp extra virgin olive oil
  • 2 tbsp tahini paste
  • 1/4 tsp paprika
  • 1 tsp nutmeg
  • 1/2 tsp red pepper flakes
  • 1 tsp salt
  • 1/2 tsp pepper
Preheat oven to 350. Peel and chop sweet potato into cubes and toss with a sprinkle of olive oil on cookie sheet. Roast for 15-20 minutes until tender. Let cool thoroughly when finished.

In a food processor or blender place all ingredients. Make sure sweet potato has cooled down enough. Turn on blender or processor until ingredients are well blended. I actually like pretty chunky hummus so I would even use a potato masher if I had to. Serve with veggies, pita chips, or for those of us eating gluten free, corn tortilla chips.

I had planned on posting a recipe for the soup, but it needs perfecting still. I think part of the problem is that I don't have good red curry. There's an asian grocery store right near my office so I think I'll stop in some time and pick up a quality red curry paste. It isn't spicy at all and just doesn't taste right. By the time I tried to make this soup I also had less sweet potatoes left than I had planned on using. It still tastes good but it needs more.

And lastly, our V-day dinner from last night.

Local MB sirloin tip roast beef from The Forks, gluten free yorkshire pudding, homemade gluten free gravy, sweet, yukon, and red chieftan potato mash, and lightly steamed broccoli, cauliflower, and kale tossed in salt, pepper, and butter.

Like The Carver's Knife, The Forks meat shop seems to focus mostly on local rather than additive free/humanely treated. But I had been too sick to go to Frigs like I had planned so this was the next best thing. I've never cooked yorkshire pudding or roast beef before but it went pretty well for the first time. I screwed up the yorkshire's a bit and they burned on the bottom and were too dense but still tasted just as good. The potatoes were fantastic again - I love the extra sweet potato taste. All in all, fantastic.

For dessert we had two gluten free cakes from Goodies bakery. I don't know about other people, but when I order chocolate cake at a restaurant I have this vision in my head of what it should taste like and I always feel like I'm left disappointed. But the cake from Goodies, despite being gluten free, is the best chocolate cake I've ever had. I urge you to give the GF diamond chocolate cake a try if you ever stop in.

Happy snacking!

Tuesday, February 9, 2010

Tropical Fruit Salad

So far this week has been one of those great weeks where I feel really productive and accomplished. Work is very busy because we're having our fundraiser on Thursday night - so I'm using this opportunity for some shameless self promotion. If you happen to be in Winnipeg and you're looking for something fun to do on Thursday night you should head down to The Park Theatre on Osborne for Fort Garry Women's Resource Centre's Women's Night of Culture.

And now on to food. So it seems Shawna and Dylan have decided to opt out of the Fresh Option box from now on. The small box works out to $16/person so we decided to switch to the small and continue starting next week. I'm really loving the set up. This week I managed to use every single thing in the box except tomatoes. Our box partners decided not to get the box for a variety of reasons, one of which was they found some of the ingredients went bad before they got to use them.

This was a bit of a problem for the first two weeks for us but this week I realized I had to prioritize my vegetable use. I made sure to make salads first with the spinach and lettuce, use the celery for chicken stock, etc. This week I've been keeping an eye on what we're getting via the website and thinking about what I want to use first and how I want to use it. I already know I'm doing Thai Coconut Red Curry Soup with the broccoli and cauliflower on Friday or Saturday and I'm planning to use the kale tomorrow, but I haven't quite decided what I'm going to do with it. Most of the other produce can last just fine for a while longer.

This method of centering our meals around our produce is also making grocery store shopping cheaper and more efficient. Either than onions, garlic, and extra bananas we don't buy anything that's not already in the produce box. So all we need to buy from the store is the ingredients for the planned upcoming major meals, regular kitchen staples, and the usual stock up items like canned goods and nuts and beans and all that kind of stuff. Ryan and I are trying to be very budget conscious so we can save up for some good vacations.

Today was a good cooking day too. I'm trying to constantly improve my eating...more natural, less processed. The more I do this, the better my health gets and I love it! I had a really tasty little snack for lunch.

That's monterey jack cheese, gouda, feta, kalamata olives, raw almonds, and a pear.

I didn't used to be a fish person but for the last year or two I've been really trying to get myself to eat more. I have never eaten salmon...except from a can, and even that was probably 20 years ago. Ryan really likes salmon so my mom gave us a couple of frozen salmon steaks. Always eager to try something new, I decided to cook them up tonight. Recently Ryan and I caught an episode of Good Eats where Alton cooked up three different types of salmon. I went with his Broiled Salmon with Citrus Glaze and once again, he didn't fail.

Pre-broiling while they marinated.

I think I really should have halved the recipe for the rub but it all worked out in the end. I forgot to take a picture after they were cooked but the brown sugar came out black and hard, but then I just peeled off the black part and underneath was a lovely glaze. Because I didn't know how it was supposed to taste I made Ryan taste it first and tell me if it was good. He said he'd never really had sweet salmon before but he really liked it. Everyone told me salmon tasted really fishy, I guess as far as fish taste goes, but I didn't find it fishy at all. It was really nice and the glaze was delicious. Because the only veggies we had left were tomatoes (which I didn't use) and 1/2 an onion I just made a basic risotto with Jamie Oliver's recipe. This is my go-to risotto recipe and it's delicious everytime. Yesterday I made 10 cups of chicken stock so I was able to use about 4.5 in the risotto.

For dessert I decided I wanted to get rid of the last of our fruit because we get a new box tomorrow. I threw all the fruit together and then was inspired by the tropical aspect and came up with this.


Tropical Fruit Salad
*Serves 2
  • 1 red anjou pear, cubed
  • 1 green pair, cubed
  • 1/2 mango, cubed
  • 1 small grapefruit, cubed
  • 1 kiwi, cubed
  • 1/4 cup coconut milk
  • 1-2 tbsp honey, to taste
Toss all ingredients in a bowl, mix, and enjoy!

I'm on a bit of a coconut milk kick lately since dairy has been giving me some issues. I've tweaked my smoothie recipe by using 1/3 cup coconut milk instead of regular milk, omitting the coconut oil, and using 1 cup of pineapple (I used canned) and 1/3 cup of fruit. I like my smoothies very thick hence the use of less liquid in this version. It was really fantastic, and I bet it would go great with a bit of Malibu. :D

Thursday, February 4, 2010

Potato and Squash Mash

In my search for what to do with all the beets from our Fresh Option box I happened upon this post on livejournal. I wasn't down with the raw part, but I followed a series of links that brought me to some other recipes that had pan fried versions. That sounded more up my alley so I ran with inspiration.


Beautiful. This was my first opportunity to use the shredder disk on my food processor and it was so easy. I shredded 3 small beets and 1/2 a small sweet potato - a cheese grater would work fine to shred the beets, just a little slower*. I combined that with an onion, a can of chickpeas and some flour and spices. I don't have an exact recipe to post yet because I feel like it still needs to be perfected. I used a little too much flour but otherwise these tasted divine. I didn't have any good gluten free sandwich bread around so I just had a breadless sandwich with some mayo, mustard, spinach, and cheese plus green beans, butter and garlic. Once I've played with this a bit more I'll be sure to post exact measurements. This recipe ended up making about 10 patties and I put a bunch in the freezer so I can just fry or bake them when I want to.

When we stopped at The Carver's Knife last week we picked up a small free range frozen chicken. I haven't cooked a whole chicken before but I looked up a few recipes and threw together one delicious, juicy roast chicken. I also made gravy for the first time too. I wanted to take pictures of the rest of our meal but the camera battery died in the process.

Ryan made the salad in the background and I put together a delicious veggie mash. The chicken was your run of the mill roast chicken with some balsamic vinegar broiled on top. The mash was fantastic so I've decided to share that recipe for today. It was a good way to use a nice variety of veggies too - we got only half an acorn squash in the box because the other half was rotten and they substituted extra potatoes. Plus it went great with the gravy.

Potato Squash Mash
*
Note: 3-4 servings - you may want to increase the amounts for larger portions*
  • 1/2 a sweet potato, peeled and cubed
  • 2 small russet potatoes, peeled and cubed
  • 1 yukon gold potato, peeled and cubed
  • 1/2 acorn squash
  • 2 tsp salt (or more to taste)
  • 1 tsp pepper (or more to taste)
  • 1 tsp nutmeg
  • 1 tbsp olive oil
  • 1 tbsp butter
  • 1/4 - 1/2 cup of milk
Preheat your oven to 350. Put 1 tbsp of oil on a cookie sheet and place acorn squash cut side down. Put in oven for 30-40 minutes or until tender. Remove when finished and let cool.

Meanwhile, place the potatoes and sweet potato in a pot of water with 1 tsp of salt. Bring to a boil and then reduce to a simmer for about 30 minutes or until potatoes are tender. Once squash is cool enough to handle take a large spoon and scoop out the flesh straight into the potatoes. Add the milk, butter, nutmeg, salt, and pepper and start mashing. Adjust seasonings to your taste.

Ryan is apprehensive when it comes to squash and when I thought of making this last night he didn't seem too keen but he loved it. It had such a fresh, slightly sweet taste. I can't figure out why people don't have squash mash or puree more.

This week's Fresh Option Box gave us some great variety of food. I've noticed that sometimes we don't get exactly what the website tells us we'll be getting but I think it's because certain deliveries aren't up to par so they substitute in with something else. We weren't expecting red pears, an extra lettuce, spinach or a yellow pepper but we got all of them. So far we've used up some spinach, lettuce, radishes, and a granny smith apple in tonight's salad plus the acorn squash, potatoes, and one of the carrots. I think we're eating even better because it's like a challenge to finish everything before it goes bad and before our next pick up. It's a lot of fun experimenting with the foods I wouldn't necessarily buy if I was shopping for myself.